The WordPress Admin Dashboard User Experience
Like your site’s visitors, content managers are also users. They deserve empathy and consideration in the product process, because their user experience matters as much as that of site visitors’. Without them, there’s no site content!
Today, we’re discussing the importance of the WordPress admin dashboard user experience (UX) and how to customize it for your content creators, managers, and publishers.
The WordPress Admin Dashboard
The admin dashboard in WordPress is where backend functionality is accessed. From it, users can write or edit blogs, pages, tags, and more. Admin users can add widgets and plugins, organize frontend information, change the layout of the site, and edit items in the media library.
As the portal through which your site is created and managed, it’s supremely important that the WordPress admin dashboard be optimized for usage by content creators, managers, and publishers. Without an accessible way to add and manage content, these key users will abandon the process and the website will suffer for it.
Keys to ensuring your content producers can easily use the WordPress admin dashboard include creating a logical layout, implementing WordPress’ content management system (CMS) for document publishing integrity, and keeping the dashboard lean so users aren’t overwhelmed by too many choices.
Optimizing the WordPress Admin Dashboard
A crucial step in optimizing the dashboard is to create templates for commonly posted pages. Whether your WordPress site includes multiple page types, such as an article, blog post, sellable item pages, and so on, or only a few, your content should be updated and expanded frequently.
This “living” content is most accessible and manageable to content creators when it’s in a templated format. A WordPress template gives content users a starting point, with sample content and easily maneuverable blocks.
Optimize the Main Dashboard Landing Page
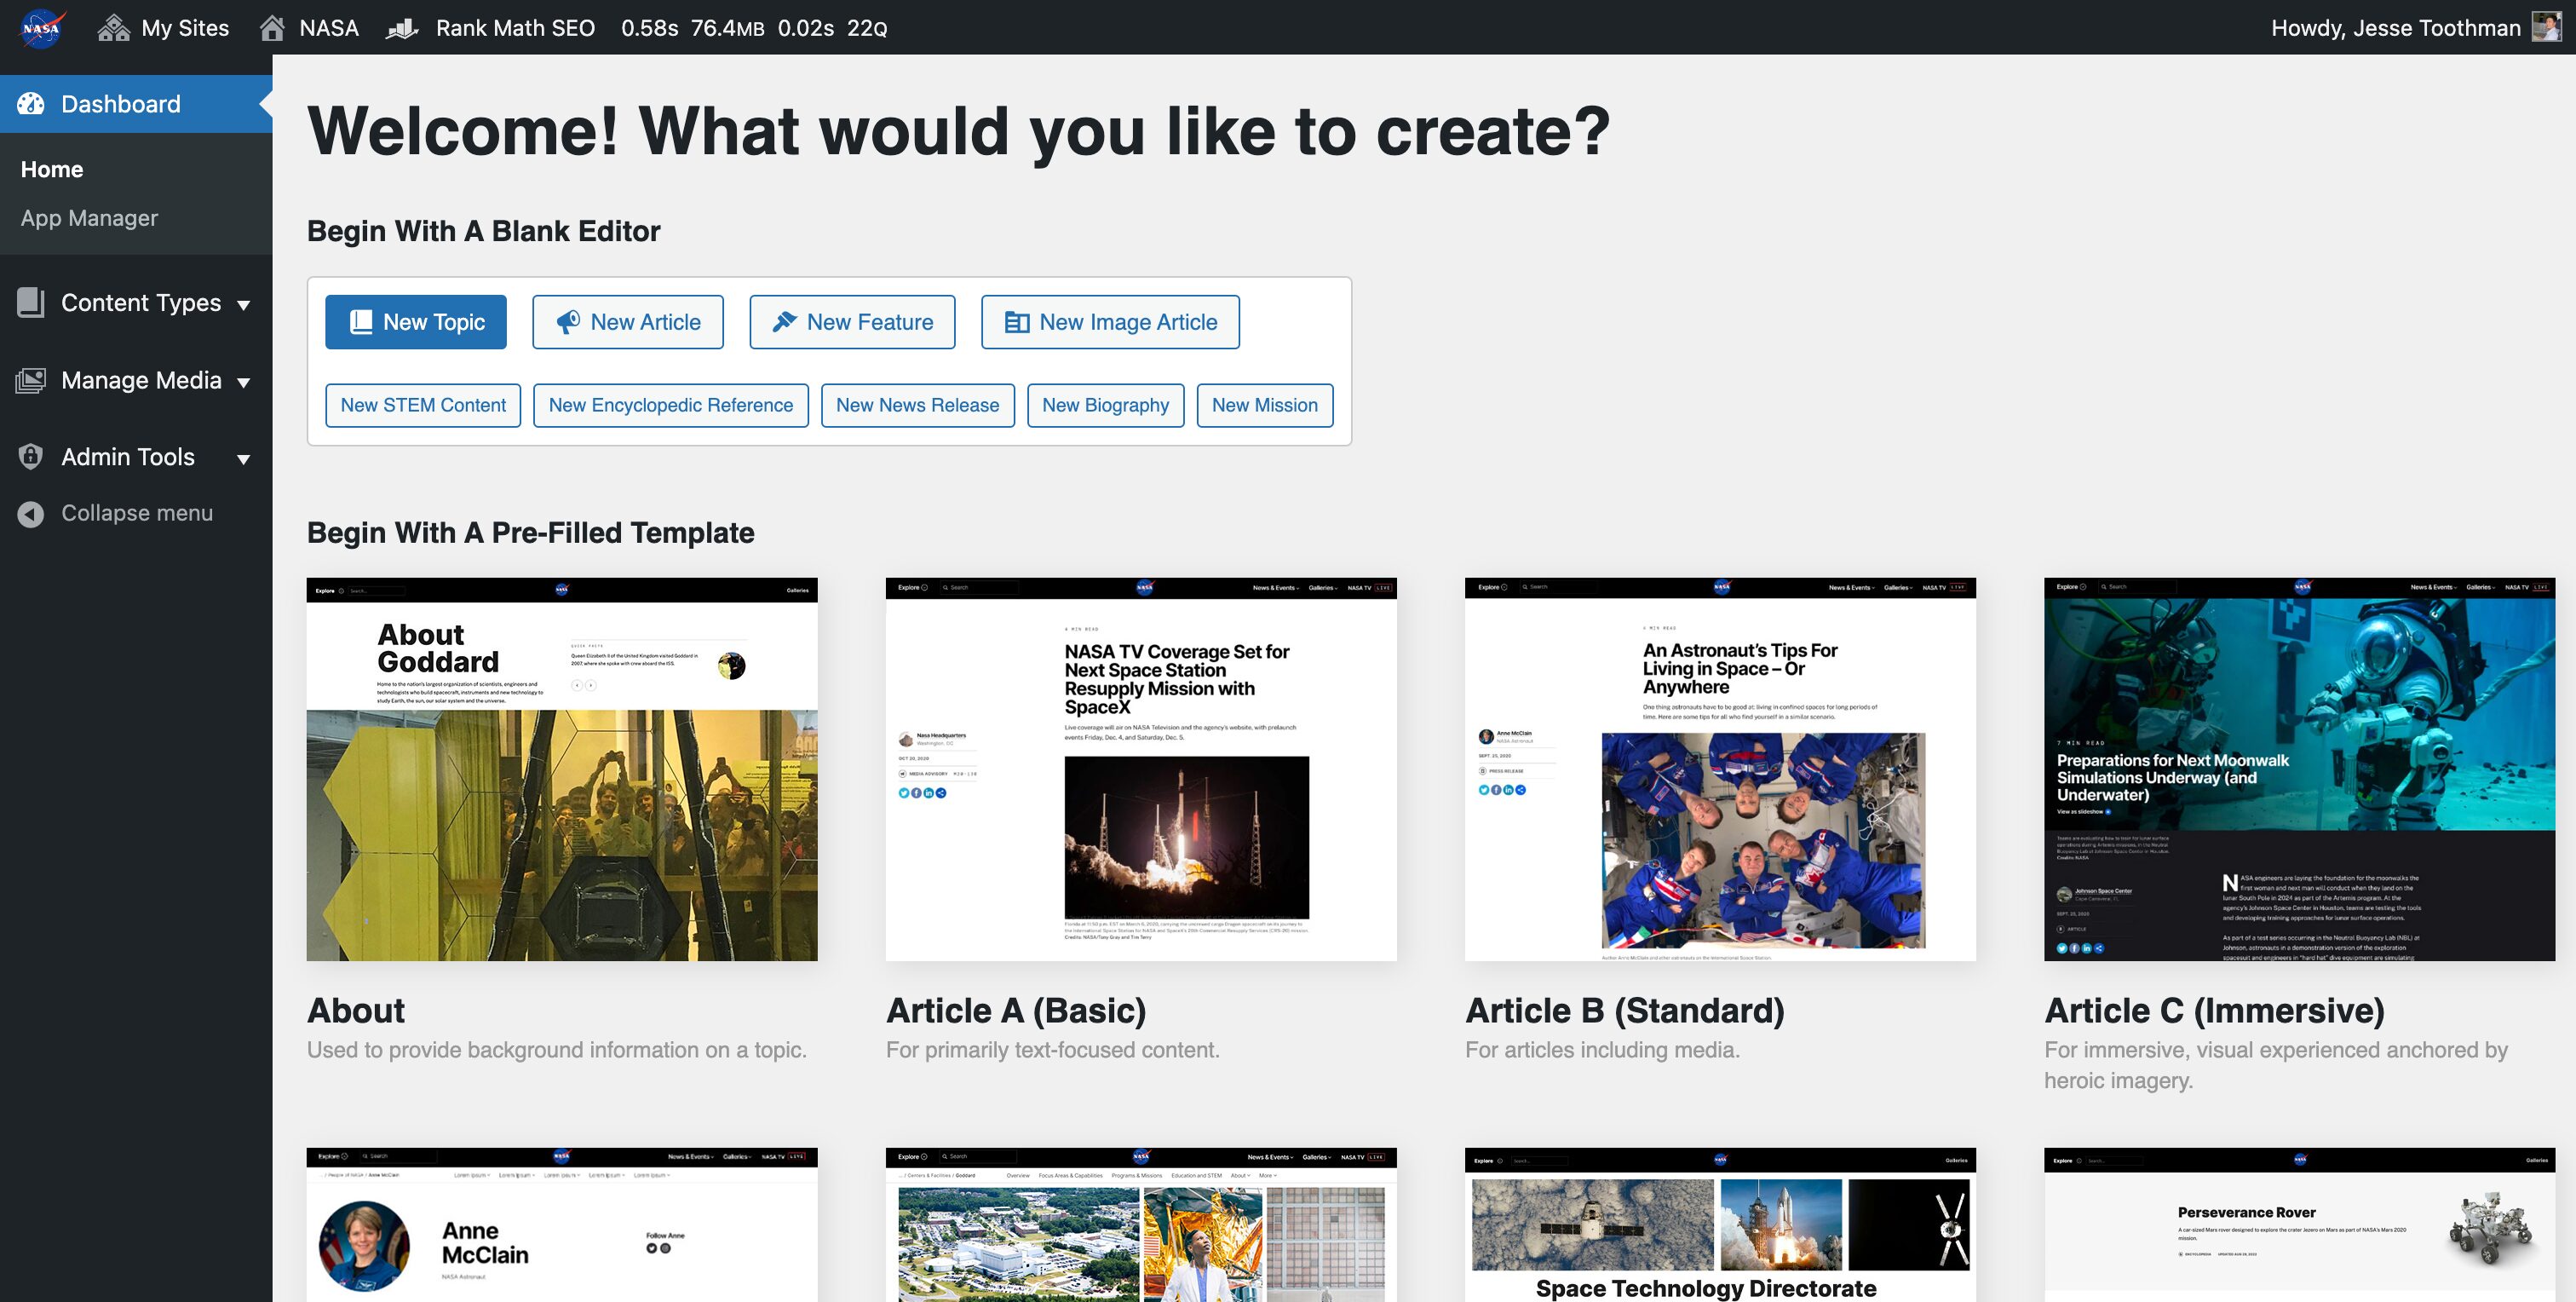
One of the easiest ways to improve content creator UX in WordPress is to simplify the dashboard landing page. Populate the landing page with the different content template types, in order from most frequently used to least frequently used. This allows content managers to access what they need most often, without extra clicks or digging through the sidebar.
Consider giving your content users the option to start from a template that is blank, or one pre-filled with sample information. A pre-filled template appears as a thumbnail image, complete with visuals to intuitively inform the user which type of content they’re looking at. These visuals also help break up the starkness of the dashboard and create visual interest.
You can also add shortcut links to the dashboard that mimic sidebar actions. In this case, an empty template can be labeled as a “new blank page”, naming it from the user’s perspective rather than the admin’s. When placed on the landing page, these small groups of tags or buttons create a clear but visually distinct option separate from the thumbnails.
Properly labeled and grouped, these shortcut links save time and effort, making the overall content creation process easier for your users. For all content shortcuts, be sure to organize them logically and under headings. These headings can even be instructions that help guide users on the order in which to take actions, such as Begin with a Pre-Filled Template.
Optimize the Dashboard Sidebar
Best practices for any sidebar navigation, backend or frontend, is to limit the choices available to the user so as not to overwhelm them. In some cases, however, it may be impossible to reduce the number of actions available on the WordPress admin dashboard sidebar. In this case, permissions can be useful.
Operating from a methodology of least-user privilege, you can restrict which sidebar actions appear to each level of user. For example, while the admin will see all available actions in the sidebar, the content editor user may only see Create New Page, Upload Media, Edit Existing Page, and Submit for Publication.
This reduces the likelihood of error, such as accidentally publishing a page before it’s been edited and approved, as well as simplifying the content creation process and thus making it more approachable for your backend user.
One important thing to note is content organization in the sidebar. Actions should be grouped under a logical and accurate sidebar title. Upload Photo, for instance, should be under Manage Media, not Content Types. This makes locating it intuitive for users, reducing frustration and increasing accessibility.
The less frustration for your content users, the more likely they are to stick to established templates and website organization.

Dashboard Nags
Dashboard nags are top-of-page messages that appear, prompting a user to download the latest version or upgrade their service level. They’re managed by WordPress or individual plugin developers, and thus are pushed out to users often. These create an unnecessary level of distraction, especially for non-admin users who may be confused about what action to take in response to seeing them.
To reduce user confusion and distraction, eliminate the WordPress dashboard nag messages for users. While there are a few ad-blocker style of plugin that can do this, you can also add a few lines of content in the WordPress admin dashboard code block.
Remove Dashboard Nags
The two ways to remove dashboard nags are via plugin and via code. To utilize a plugin, scroll to the section of the sidebar labeled Plugins and click on it.
- On the right side of the page, next to the search bar, click the drop-down menu and select Keywords.
- Enter “hide dashboard notifications” in the search bar and press Enter.
- In the top results, click to install Hide Dashboard Notifications or Hide Admin Notices. The plugin will install and automatically activate itself.
If you’re comfortable using code, install and activate the Code Snippets Plugin. Once installed, scroll to the section of the sidebar labeled Snippets and click on it.
- Click Add Snippets, underneath it, to create a new code snippet.
- In the title section, enter “Hide Dashboard Notifications”.
- Copy the code below and paste it in the code block:
add_action(‘admin_head’, ‘remove_admin_nags’):

Function remove_admin_nags() {

echo ‘<style>

.update-nag, .updated, .error, .is-dismissible, notice-success, div.updated { display:none !important: }

</style>’:

}- Ensure that the Run snippet everywhere radio button is selected.
- Enter a relevant but brief Description.
- Click Save Changes.
If you refresh your WordPress dashboard, you should notice any existing dashboard nags have disappeared. Either through plugin or through code snippet, suppressing nags will keep your WordPress dashboard clean and easy to use.
Plugins and UX
Plugins are great, but they can easily clutter the dashboard with their individual UX patterns. This creates more work for the WordPress admin in suppressing their appearance for lower-level users, and can clutter the dashboard in an overwhelming way for the admin user.
Not all plugins are labeled well, and their UX may overlap or repeat existing UX from other plugins. Thus, it’s best to be as lean as possible and use code or WordPress’ built-in functions, wherever possible.
Get Help With Your WordPress Admin Dashboard UX
If you’re finding this a little too overwhelming, allow Lone Rock Point to help you optimize your WordPress admin dashboard. We’ve worked with clients like NASA, to ensure their WordPress CMS runs smoothly and is designed with content specialists in mind. Contact us to start the process.